Showing posts with label kids. Show all posts

Wednesday, November 20, 2013

Winter DIY - How to Make a Winter Bouquet

My kids are growing up differently then I did.


My childhood took place in two different continents. We went back and forth between Israel and the USA until I was twelve. We never spent more then two years in one place - moving around many neighborhoods and schools.  The years  in America were spent in a classic suburban setting - a front and back yard, plenty of open spaces but very little independence, mainly due to my parents feeling it wasn't secure enough for us to walk around on our own. The years in Israel were spent in Jerusalem, a busy city full of people, traffic, cafes and the regular hustle and bustle of a busy city. We were free to take the bus and walk around the city as we pleased.


Sometimes I look at my kids and I realize they haven't been out of our community in a month (!) No stores, no traffic - just the quiet Israeli countryside. I find myself feeling bad for them, even though I'm pretty sure they could care less. They seem perfectly content.
This week we went out for a walk in the woods surrounding our house. I took pictures while my kids ran around, climbing, shouting, having fun.


We gathered branches we found lying about to make a winter bouquet. When we came home I made a couple of different bouquets. Fist, I took some Holiday Ornaments from my shop and hung them on the branches set in a vase. This would look equally pretty on a branch hanging from the ceiling.

 
You can purchase the ornament here

For a more colorful bouquet (but still super simple to put together) you can stick Washi Tape on the branches (I chose neon pink and a minty green color for the tape).

Washi Tape makes everything better
A little while ago it occurred to me the longest I've ever lived in the same house has been the Caravan we're living in now while we're waiting for our house to be built - eight long years - and that kind of freaked me out. I don't like to settle down - I love moving around and discovering new places. But this week with my kids in the forest, I felt content being exactly where I am, no matter where we'll be tomorrow.

Have a lovely winter,
Elisheva

P.S. The ornaments are for a limited time - until January or when they run out - whichever comes first, if you like them you'd better hurry:)


Thursday, July 25, 2013

Pop of Color

I've always been a very visual person. Memories are stored as movies in my head, my thoughts are like a photo album, and I have a knack for remembering faces - I'll often recognize someone on the street who once rode the bus with me.
A lot of my memories are associated with color. I remember what I wore on a certain occasion, what color the room was, the dishes, the food.... This might sound funny, but when my niece asks my brother to tell her stories about his childhood, he send her to me - telling her the stories will be more accurate if I tell her his childhood memories.
Colors remind me of emotions, experiences, people and objects.
I decided to photograph some of my designs by color stories, and see what memories they spark. It was a pretty cool experiment,  and I am really happy with the outcome.

 
In this photo: Linen Napkin, Candlestick Stack, Butter Board, Graphic Coasters. See more here

Pink Remind Me Of....
A summer dress twirling in the wind, my mothers dishes on a rack, a walk in the park, the wallpaper on my childhood bedrooms walls, summer fruit, a babies blanket.

 
In this photo: Linen Napkin, Candlestick Stack, Butter Board, Graphic Coasters. See more here

Blue Remind Me Of....
My sisters room, the beach and the pool, summer camp shirts, winter rain, excitement before a long flight, the flight that never ends, first earrings, ponytail holders (the chunky kind) 

 
In this photo: Linen Napkin, Candlestick Stack, Butter Board, Graphic Coasters. See more here

Black and White Reminds Me Of....
Holiday dinner, old movies, fancy dishes, newspapers by the door after the weekend, dripping ice cream, chocolate cheesecake.

And once you combine the colors together, all of the emotions and feelings mix- you don't even know why you feel something specific - and why it was triggered. And you keep trying to perfect the amounts and the relations between the color until something clicks. 
Here. Just like that.

 
In this photo: Linen Napkin, Candlestick Stack, Butter Board, Graphic Coasters. See more here

And because it's summer vacation here in Israel, my eldest (5 years old) is currently interning at Hook n' Loop design. When he saw what I was doing he wanted in on it - this is what he collected in his room. I helped him organize it.

 
In this photo: A ton of toy cars, Cookie Monster, Grover, and some random elephant puppets.

How about you? Do you remember by color? Or is it something else?
Let me know in the comments below.
All of what you see here can be purchase at www.hooknloopdesign.com or on my Etsy store - www.etsy.com/shop/hooknloopdesign. 
Have a wonderful week and meet me again here next week,
Elisheva

Tuesday, July 9, 2013

Big Bubble DIY

If you've found yourself looking up one of these phrases on Google:
1. Activities for summer vacation
2. Stuff to do with kids during summer vacation
3. Cool things to do with kids that are fun and not too messy and photograph well

You've come to the right place.


My childhood memories are filled with bubbles. Growing up in the US, the bubble bottles were kind of chubby, and had a really sweet smell, while in Israel, till this day, the bottles are really thin and the smell is soft. We'd run out of bubble juice so fast, and then my mother would fill them with dish soap solution, but it just wasn't the same.
Maybe it's the nostalgia, or maybe it's the fact that bubbles are THE BEST at any age, during the summer I'd say we go bubbling about once a week.
I fill a huge bowl with home made bubble solution, and off we go to the park.
As for the wands, here is a simple DIY you could do with just about any cotton weave strap (it would probably work with synthetic as well) or rope you may have. I use leftovers from the strap we use for our constantly breaking blinds. I attached two plastic hoops to the rope and knotted them in place - place them fairly close together so a child (or adult, no judgement) can easily hold on in each hand, then close of the rope. If you don't have hoops, no worries! Just make a loop with the strap and tie it in place.


My oldest tied the rope to a stick, and my youngest followed his lead.


The cool thing about these bubbles (other then the fact that they're huge) is that they are great for and little kids and big ones (and there mothers, of course). It takes some practice getting it right, which is great for the older ones, but sometimes the wind makes bubbles on it's own, which is great for the little ones.


How does it work? Hold a loop in each hand and bring them close together. Dip the entire thing into the bowl, making sure it all gets covered. Slowly bring your hands out and separate them  - the strap will have a "wall" of soap on it. 


You can then blow a bubble with your mouth, stand across the breeze, or swirl around creating your own breeze.


 Wanna try this at home? Here is the recipe we use:


Just add 1 cup of dish soap to 12 cups of water, add 2 tbsp. baking powder (not soda) and 1 cup cornstarch. They say it help to let it rest, but I can never wait that long.


If you have a different recipe, or any other bubble related ideas, fell free to post on the comment section.
See you next week,
Elisheva  


Tuesday, June 4, 2013

Displaying Kids Art - or what am I supposed to do with all of this artwork???

So Lately we've had some Holiday time in Israel, and I found myself looking for things to do with the kiddies. We spent a lot of time coloring and doodling - although my daughter is only two, she seems to have found her calling. She fills page after page using her crayons, and they keep piling up. But it's nothing compared to the amount of pictures my son brings home from Kindergarten.
If you have children - you know what I'm talking about. I often find myself buried under yet another pile of "art" - wondering what would be the motherly thing to do. I'd love to help my budding Picasso's, but how do I do that without having my house look like a Kindergarten? A lovely reader asked me just that (thanks, Michal) so here are a couple of ideas for displaying kids artwork - while still maintaining an esthetically pleasing home.
Every parent has there own point of view. Some have folders and binders filled with there children's laminated artwork, others chuck it all out while their kids are sleeping - I'd like to suggest a middle ground:) Go over the Art with your child - decide together what you're keeping and what you can throw away. Once you have chosen, here are a couple of ideas - and why they work.

1. Artwork Poster:
This photo is taken from the house of Designer Jan Elen - she takes pictures of her kids drawings and sets them up on a poster sized file in a neat grid, then has the poster printed and framed. The expressive artwork organized so severely gives this poster a modern feel, meaning it  could easily be hung in the living room. (And a digital catalog also take up a lot less space)

 picture taken from here

2. A photo wall:
Get a wallpaper like effect  by hanging the pictures in simple identical frames (these were purchased ad Ikea). Choose a bold color and many frames.
Why? Because it makes all of the eclectic pictures seem more like a collection,  which make the wall look modern and not cluttered. And what boy or girl would not get super excited to see a wall like this made from there own masterpieces? Every once in a while you can refresh the display with their more current work.

picture taken from here

3. A changing display:
Use a couple of clipboards to make an ever changing display of kids art. You can hang one picture every time, or a couple. I would recommend using at least 4 clipboards. Why 4, you ask? Think of just one clipboard on the wall.
Hmmm, nothing special.
But a couple of them - well that makes a clear statement. When working with something so colorful and eclectic (in our case, children's drawings) you need to find a way to let your eye rest and take it all in. Keeping a neat grid with even distances between the boards will do just that. You can also set aside a clipboard or two for each family member.
Cute, right?

 
photo from here

4. A Handmade Card
The idea for these handmade cards came from one of my older designs - wooden wall decor for kids (you can still purchase them here), and it works best with the more, ummm, abstract children's drawings (my personal favorite - we call them dancing colors). 
So how do you make them?

Fold a piece of cardstock in half. Draw the image you'll be cutting out with a pencil (you can also trace something you've printed). It could be anything - a simple heart shape, an animal, you get it. Use an exacto knife to cut the image out. (You could also use a fancy whole punch. Just remember the bigger the shape is the more artwork will be seen).
Open the card and and glue your kids art inside (you may have to cut off the edges depending on the size). When the card is closed the cut out image fills with the colorful details of your child's art, and when it opens you have a small surprise. 


My kids really loved this. I think it made them feel included and useful - and super proud.
I hope I sparked some new ideas for displaying kids art. And truthfully, you could use these ideas for displaying lots of other forms of art - postcards, doodles, pretty papers - you get the picture.
So what do YOU do with your children's artwork? Share your ideas in the comments!
Until Next Time - 
Elisheva


Sunday, June 2, 2013

House Visit

So where did you say your from????
This is what people normally ask when I tell them I'm from Shekef.
The next question is always - What?!
The truth is, I never know what to answer when people ask me where I'm from. In Israel, is my usual answer. But going into detail is always a bit more difficult. You see, I live in a teeny tiny village (it's not even that much of a village) with only 80 families in Southern Israel. The closest city is called Kiryat Gat, and it's about a 15 minute drive on a winding road filled with cows and vineyards.  So windy, in fact, that every time my mother comes to visit from Jerusalem she calls from the road to say she thinks she got lost. No Mother, you're not lost. Keep going. A bit more. In the end you'll make it.

 
How did we end up living here? Well about 7 years ago my husband and I moved here from Jerusalem to join a small community of super nice people named Eliav. We are supposed to build our house here, and are living along with all of our neighbors in small trailer in a community named Shekef in the meantime. Hopefully we will start building our home in August on a nearby hilltop.
 

This area is beautiful all year round. But it is especially lovely during February, when the Anemones start to bloom. Red carpets suddenly spread out along the hills and valleys, and the road that is usually completely empty is suddenly filled with traffic. OK maybe not traffic, but they're are definitely a lot more people.
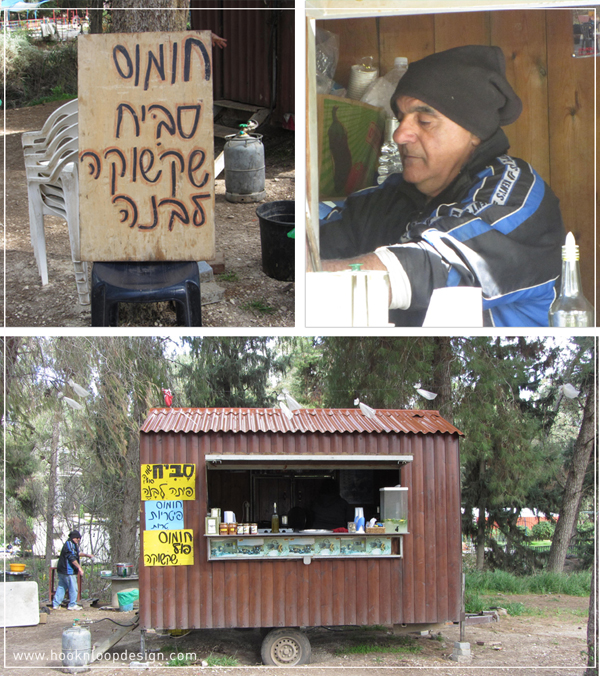
So please join me for an inspiring hike down the road leading to my little house. You can bring anyone you want - my kids will join us too. And because a hike is always connected to food (well, in my mind everything connects to food:), I'll give you a little culinary local secret - Deweys (pronounced Doo-ee) Hummus.

 
Dewey is a well kept secret in our area. He lives in Shekef (where I do) and almost every day he ties his little house shaped trailer to his pickup truck and drives it about 10 minutes closer to the main road. In a little clearing in the woods there are a couple of plastic chairs, some tables, and the best Hummus I've ever had. And I'm from Jerusalem - I know my Hummus!

 
He makes his own olives,  Olive Oil, and Hummus of course. You can also order a Shakshuka (an Israeli dish made of eggs and tomato sauce - it's amazing) or Sabih (a sandwich made with a hard boiled egg, eggplant, and a potato in a pita) and sit under the trees enjoying the cool breeze. On any normal day you can find a handful of farmers, some truck drivers and a bike rider or two, but during February there are a lot more tourists coming to see the flowers bloom. 
Working from home is often a lonely thing. Sitting in front of my computer for hours on edge, I sometimes forget to enjoy where I live. It's important for me to remember to seek inspiration outside of the computer. That way I can give my designs a more local touch. A lot of the inspiration for my collection comes from hiking around our house with my family.

 
So if you have a couple of hours off, I highly recommend stopping by. And next week, I will be showing you all of my new designs, right in time for Spring!
See you soon,
Elisheva


Related Posts Plugin for WordPress, Blogger...